Friday, 22 June 2012

Decorated Cigar Box

Last week I bought meself some old cigar boxes.  And old, sorry, vintage they are.  I lucked in with this particular lot as I paid for 5 cigar boxes and got 6 plus 3 wooden boxes that they came posted in.

Anyway - here's a semi-stripped box:


Once I'd gotten all of the original paper off (I would have kept it but it was peeling off) I decided to cover the box in some handmade paper that I've had in my stash for about 15 years (yes, I am a hoarder....)


The inside needed some work so I cut out a section of an old shoe box and covered it in felt and velvet.


It's at moments like this that I love my glue gun.


Once inserted I added a matching paper to the inside of the lid and then I added a square in lilac with silver embossing on it.  You can't see the the silver such is my photography (actually, I have another post in mind about that).

That was the inside sorted (ish).  Now for the outside.  Originally I had some Mucha pictures I was going to use but once I started cutting out and placing them on the surface they didn't seem to look right.  So I played around a bit and decided on a semi nude, a dance hall ticket, a random bit of ephemera and a moth....with some Mica on top.  And some flowers.  And a bit of vintage jewellery with a zebra print on it....


Once I opened the box up I decided it needed a bit more on the inside so I cut out some moths and butterflies and added them and then sprayed both the inside and the outside with my homemade mica/pearl spray.


Hopefully it'll all be dry enough tomorrow to put my domino pendants in for an event I'm vending at.  Might as well make it beautiful and useful to paraphrase William Morris.

Changes....

So.  If you subscribe to my blog, or if you just happen to wander by, then you'll notice that I have changed the look.  I'm liking it a lot.  It shows some of the digital art I've been playing with and is more me.

There are a great many projects all going on inside my head at the moment.

I'll try and make a list of things I want to do:

Write a new choreography - or at the very least find a piece of music that I love love love so that I am enthused to dance to it.  At the moment music is eluding me.....but I'll keep you posted......  I'll probably need a new costume too (hopefully - I've not made myself a new costume for some time.....)

Start an art journal - this is the most frightening thing on my list.  Why frightening?  Because I am rubbish at art.  Yeah I know......but I kind of feel that I am.....because I am feel constrained and stunted....I need to be able to let go sufficiently to feel freed up.  This is why I aim to start a journal.  I may or may not share it initially but I guess the purpose of the blog is to share so I guess I should be brave....  Today I was in Paperchase and they had loads of books on sale - I spent aaaages choosing one (in the end based on price) and I decided on a Home Journal book - it's got lined pages, squared pages, blank pages and clear pockets.  I definitely need to cover the front and the back and then I need to start to let my inner artist speak on regular basis.

Decorate some boxes - I have some cigar boxes to decorate.  I have one that's almost done and although i think it looks good I'm disappointed because it just looks like something I would expect myself to produce.  I need to push my personal envelope.

Start to try more new things.  Now, scarily this might mean opening up to new people and inviting them into my life.  Or it might not.  I'm not sure about this one.  I kind of think I can do all of the above without inviting new people in but I kind of think that maybe I should expand my circle.  Except I don't really go out. Hmmmm.....

I'l keep you posted.

Thursday, 21 June 2012

It's all gone a bit arty.....

The arty theme has continued in the house this week.  I've slowed down a bit but I think that's why I like to make the most of my free Saturday - it only comes every other week and I have to do what I can.  I am in the midst of decorating a cigar box so there'll be pics of that when it's done.

Last night my daughter got in from school and wanted to do some painting.  She and her brother had just got started when I realised she had some homework to do so she came and sat with me in another room to do it.  When she went back to the dining room table she cried out, "Oh no!!"  Oooohhhh.......her brother (three-and-a-half) had been quietly painting.....it's the quiet bit that's the scary part isn't it?

Here's what he had done....


What was coloured paint was now black. He'd tried to mix himself some colours by adding lots of black paint.  Ah well, at least he hadn't painted the walls and luckily I had more paints stashed away in the cupboard so it wasn't the massive disaster it might have been.

Sunday, 17 June 2012

My Creative Saturday

This weekend, whilst the children were at their dads for the weekend, I was determined to make something for the sake of making.  I have so many things I want to try out at the moment that it was hard to decide what to do.  So as I drank my third cup of coffee on Saturday morning (honestly, I'm not really a caffeine addict!) and scribbled down my thoughts I came up with the idea of working to a theme and getting as many projects done as I could around that theme.  I had 6 hours to kill and here's what happened.

I decided on the theme of Dance Envy.  I won't go into why but it's close to my heart and my first project was to come up with a collage.  A paint and fabric and paper and stuff on a board collage.  I really dislike collage in this form, I just can't get with it and so this was the most difficult part of the process.  Despite the theme being envy I wanted to stay away from the obvious colour choice of green so I opted for blue (blue is also  mood right?).  Here's the collage I came up with:


Ok, that's that bit out of the way.  The next two items were kind of made at the same time - whilst a bit of one was drying I worked on a section of the other etc....

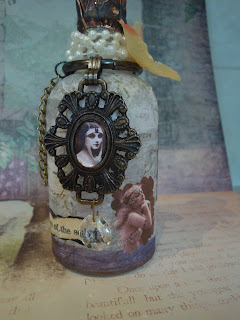
I added a layer of matte Mod Podge to a sheet of scrap-booking paper to make some folds a little more durable and whilst that was drying took it upon myself to decorate a bottle to make it into a Dance Potion bottle...here's what I started with....

The bottle was a Rose Lemonade bottle I bought whilst visiting Avebury stone circle with a friend earlier this year.  The shape was lovely so I kept it and now it has served its purpose.  I covered it with  tissue paper I printed with a vintage scrip from a letter I found online.

The blue liquid is a patina fluid - I stuck a big old sparkle stone on top of the bottle and the wrapped it in copper tape (the same stuff that does not keep slugs off the pots in my garden).  Wash all finger-print oils off of the copper tape and then apply as per the instructions.  Except, applying it as per the instructions did not work so I added some neat to the copper tape and then yes, the copper turned from bright and shiny to brown before my eyes.  I rinsed it off once I was happy and quickly dried it off.  I then added more embellishments, making sure to add the same photo that was on the collage for a sense of connection between the items.

I swiped the bottom of the bottle with a distress ink and some copper from an ink pad, added a label I made from a font I found online, and a dance quote I liked plus a couple of other vintage prints plus the other stuff you can see here.  I could detail it all but at the end of the day you just have to play with what you've got....


And to finish the set I made another little ephemera wallet, with the words Dance Diary on the front and the words Dance Envy in the centre.....


All three together look fabulous.....art for arts sake......

There will be more themes.....

In the meantime head on over to Handmade Harbour to see what other craft folk have been up to.  And don't forget, to create is awesome.....


Friday, 15 June 2012

Scrap Booking Techniques

So today/tonight I was overcome with the urge to create something a bit conventional - just to see how it turned out.

This week I found a Youtube tutorial explaining how to make a mini-wallet.  You can see it here.  I guess at this point I should add that I've had stamps and inks and embossing powders and the like for years but I've always used them slightly unconventionally and it's only recently that I've been drawn to more conventional scrap-booking, I'm just not sure that conventional scrapping is for me.  But in order to explore I need to take a couple of first steps....

So, I made a wallet.  I'd made one the night before and realised that the constant opening and closing of the wallet lends itself to the paper-stock tearing.  Card stock is too thick, paper stock is better but it degrades.....unless you add a layer or two of Mod Podge to the surfaces.  If you try this out and cover both sides of your paper in Mod Podge (matte) then make sure it's all dry (really dry) before you start folding.


Here's the front of the mini-wallet.  There's a little card tucked into the front and the fibres are attached to another card accessed from the front folds.  Somewhat cloyingly the word Memories has been stuck on the front...I'll have to change that next time.....


This pic shows you the size of the item.....it's quite dinky.


Here's the back which has the same set up as the front, two cards are accessed in the front folds.  Now, are you wondering what you could use these cards for?  The idea is that you get little photos or bits of ephemera from an occasion and stick them onto the cards.  You can also use the cards to make notes as at least one side of each is not so decorated as to make this impossible.


Anyhow, back to the front.  Here you can see three cards, the two I mentioned before plus another that is tucked inside the front page.  This one has a grommet punched into it and along with another inside the second page this is how you can keep this little treasure shut by tying a ribbon through the both of them.


Open the wallet up and here's what you see.  What may not be so obvious is that there are another two cards tucked away inside the folds, accessed from the centre via the cut outs I have made....  and the moths are printed on a transparency that acts as a little pocket for tickets or other such ephemera.....I had forgotten to add the instruction, "Don't forget your ticket" to this page but did so after this pic was taken.


 Here you can see the two cards and the ribbon used to tie the wallet up...


And here's the back, decorated with some very old buttons....

All in all you have 16 surfaces on which to store memories, plus a little pocket to slide a ticket or even another photo.  Yes, you'd have to get small pics printed from your PC but I think this is a lovely way to offer a gift.  Maybe you could slide a gift card inside the front pocket, or a ticket to an event and then let the owner add their photos of the day or evening?

I hope to make some more of these and be a little more adventurous in their conception and decoration....

Thursday, 14 June 2012

Digital Art

I am a baby beginner at this.  To be fair I've had Photoshop 7 for years and all I've ever really done is use it to resize photos.  Maybe I've been a bit overwhelmed by it?  No matter, I found a great Youtube clip about using masque tools and layers in Pixlr, the online editing tool that is very similar to PS) and I've been playing ever since.  It's how I made the images I've used on my domino pendants and I made a couple of cards recently too this way.  The tutorial, here, combined with this one about making digital stamps have made me feel a little more confident and so I want to explore this genre further....

Anyhow, here are some of the images I've altered.  All of the images are royalty free and available on the web.


(The above pic has become a domino pendant for my daughter - she loves her new pet gerbil so I thought this was cute)


As I say, I'm a baby beginner.  All I can do is continue to play and see what comes out.

In the meantime I appear to have bought a couple of empty cigar boxes on an auction site - I was inspired by this page to have a go at making some altered cigar box bags.....

Wednesday, 13 June 2012

Art For Art's Sake

There is a massive part of me, a huge and almost overwhelming part of me, that wants to indulge myself fully in the world of art.  Which means messing about endlessly with stuff.  Ephemera and kitsch, attempting to express myself via Lazertran and tiles, inkjet transfers, crazy quilting, altered art, collaging, doll making, scrapping and digi art....I want to try it all.

I need 48 hours in a day with the need for 2 hours sleep and no responsibilities inbetween.....

And so I am addicted, yes addicted to art-e-zine.  I cannot stop drinking it all in.  Some of it I turn away from run away from.  Other articles I drink in and feel drunk from looking.  And the list of things I want to try grows longer.  And inbetween I need to fit in my responsibilities, my loves and my life.  I have a short time in which to indulge myself and I have to stop procrastinating and let the Muse run free, unafraid of criticism and censorship.  I just have to be brave don't I?

Monday, 11 June 2012

Altered Things

To be fair I do mostly *alter* things when I'm making something - mostly old bits of jewellery that come into my possession that get taken apart and then made into something new.

But I've felt the need to try some new techniques and decided to have a go at making some domino pendants.  Did I have any dominoes in the house?  Nope and one day a couple of weeks ago it took me two hours to find some in town - all of the shops I thought would have some didn't and in the end I got some little black wooden ones and a box of cream plastic ones from a bookshop of all places.

I think I'm going to add a tutorial about these little babies soon so for now here's a pic of some of them under a bowl so that their coating of Glossy Accents doesn't pick up dust.


All of the vintage images I used were free and I played around with all of them in Pixlr to get some different effects.  They look a little cloudy here but that's due to the wet Glossy Accents.  I discovered the little hand tool I have isn't powerful enough to drill into the plastic dominoes so I shall have to stick a bail on them, but my smallest drill bit goes easily into the wooden dominoes and that's much more exciting as it means I can drill holes into the bottoms and add eye-pins and dangly bits for extra interest.  Once they're completely finished I shall definitely post some pics cos I'm really loving these.

Next up are some pics of two jars I *altered* over the weekend using stuff from my stash.  Once the base papers are on and dry it's just a case of imagination and glue-gun so they're a fast make.  Well, kind of fast!  The first one is light shades as I was going for a shabby chic look:


Again I used a free vintage image and stuff from my stash.  It's decorated all the way around but I'll save further pics for a tutorial...

And last of all is a Ganesha inspired jar as I like darker colours:


Again there are pics and some stamping all the way around this one.  

I love making these - it's my new favourite way to be creative and I shall be playing with these some more.  In fact I have some little bottles that I'm going to make into poison bottles....(not literally of course!)

And with that I shall leave you with lots more creativity - make sure to mosey on over to Handmade Monday and check out the lovely things people make. xx