Ok, if the truth be told it's not that new a website but here's the story. Once upon a time I used to sell via www.blackwillowtribal.co.uk where I offered tribal belly dance costumes and accessories. I would import bits and pieces as well as pick up things here in the UK and incorporate them into well made and affordable costumes for those who weren't interested in making their own. The site brought me a lot of work, particularly custom orders for headdresses which I absolutely adore making.
After my son was born some three and a half years ago I found that the recession bit deep and hard and although my site was looked at as often as it always had been, the orders were dropping off. I also wanted to add things to the website that I couldn't unless I paid my hosts more to do so and the more I weighed up the costs of running it and the pros and cons of other websites the more I felt in favour of getting rid of it. So last September I closed the website down and ever since I've needed to get in touch with all of those linked to me and let them know.
I'll try and cut this a bit short.....I'm currently rebuilding the site but with a slightly different slant as I sell via Etsy now when I'm not at events in real life, plus there is Facebook and Twitter and blogs and.....well, you get the picture...but I want people to know that I'm still here and that I'll happily make them a bespoke tribal belly dance or fusion belly dance costume or just a headdress.
This weekend I had a go at manually changing my A records (with a new registrar as the previous registrar had Detagged the site cos I didn't know then what I know now about claiming your domain) in order to point the domain at the new site and today was a little annoyed to see it still wasn't live until DOH! I realised looking over everything again when the kids were in the bath that I had missed out one number of the new IP address. Silly me! I've rectified the mistake and hopefully by the end of the week www.blackwillowtribal.co.uk will be back up and running again. Fingers crossed.

Showing posts with label tribal belly dance. Show all posts
Showing posts with label tribal belly dance. Show all posts
Tuesday, 13 March 2012


Saturday, 14 January 2012
Headdress Sneek Peek
I made a couple of headdresses last night. To be honest I'm not sure if they're finished yet, but I took some pictures anyway. I might add some jewellery, I might not - I'll see how I feel when I sit down with them again on Sunday evening....


Monday, 14 March 2011
Sneak Peek
I have a couple of vintage items that will go up on Etsy in the next couple of days, two of them are vintage Banjara anklets, usually used by Tribal and Fusion belly dancers these days as other body costume parts. There's also a really delicate lapis necklace. And for the non-vintage lovers I have a new cuff and will soon have another in the same fabrics and lace but with extra embellishment......


Oh, and there's a headdress that I need to get a good full headshot of.......


Oh, and there's a headdress that I need to get a good full headshot of.......

Wednesday, 2 March 2011
Feathers!
Today saw the arrival of many new feathers to stash and I will confess that fly-tying feathers are officially my new objects of joy. I've not been able to buy as many colours as I would have liked but I have lots of plans for the ones I've got, especially the beautiful strong and flexible generic hackles that enable me to thread things onto them without damage to the filaments. The dust-buster will come in very handy in getting rid of the excess fluff that needs to come off of them in order to make sleek and sexy earrings and other accessories.
And now I'm working my way through a huge list of *things to do* so that I can free my mind of clutter and get on with designing and making as I can find the mundane things in life can get in the way of creativity (although I'm pretty good at not doing the ironing, that one never bothers me.)
I've paid for my Deb Rubin workshop that will be happening at a weekend event in Southampton in April (details can be found here) and I'm very much looking forward to that. As well as doing a workshop I shall be dancing with Covert Bling in the evening Hafla and vending as Blackwillow Tribal on the Saturday. Make sure to come along and say hi if you're there.
I now have to go and pay for my WOMAD ticket as I plan to take the kids there this summer, reply to a couple of emails, and have decided that I need to take a trip to Fabricland this week in order to see a couple of fabrics in the flesh before putting in an order for some fabrics for Covert Bling.
Once that's all done I'm going to sit back and play with feathers for a bit!
And now I'm working my way through a huge list of *things to do* so that I can free my mind of clutter and get on with designing and making as I can find the mundane things in life can get in the way of creativity (although I'm pretty good at not doing the ironing, that one never bothers me.)
I've paid for my Deb Rubin workshop that will be happening at a weekend event in Southampton in April (details can be found here) and I'm very much looking forward to that. As well as doing a workshop I shall be dancing with Covert Bling in the evening Hafla and vending as Blackwillow Tribal on the Saturday. Make sure to come along and say hi if you're there.
I now have to go and pay for my WOMAD ticket as I plan to take the kids there this summer, reply to a couple of emails, and have decided that I need to take a trip to Fabricland this week in order to see a couple of fabrics in the flesh before putting in an order for some fabrics for Covert Bling.
Once that's all done I'm going to sit back and play with feathers for a bit!
Monday, 14 February 2011
Earrings
If you've worked out my process yet then you will have worked out that my earlier post about fly fishing feathers
was going to lead to a blog about how I've made something from feathers like those I mentioned earlier.
I've made a few pairs tonight and once the glue has dried I can get them finished and get some pics up to show you what I've done. I've yet to decide whether they go onto the Blackwillow Tribal site or the Etsy shop.
was going to lead to a blog about how I've made something from feathers like those I mentioned earlier.
I've made a few pairs tonight and once the glue has dried I can get them finished and get some pics up to show you what I've done. I've yet to decide whether they go onto the Blackwillow Tribal site or the Etsy shop.
Wednesday, 9 February 2011
Making yarn falls
This is a pretty easy if time consuming task.
You need your basic ingredients and for my falls I always use a base of Point 5 wool by Colinette. Midnight (black, or as close as dammit) is the colour. I'm also using some lime green roving. The other yarn pictured here didn't get used in the end. It didn't look right. You'll also need a pair of scissors, two strong elasticated covered hairbands, a needle and thread and some hair beads and other things for decoration if decoration is what you want.

The lime green roving is shown here in the first stages of being formed into dreads. You pull a section of the roving away from the long thick strand you get, and then start rolling it between your hands. All the way along its length. To get a close texture to the fibres keep doing this over and over.

 Once you've done all of the roving strands and you're happy with them it's on to the fun bit.
I start by taking strands of Point 5 and counting along the strand a regular number of thicker sections. The wool is both thick and thin and is consistent in this thick/thin texture along its length. So I start with 6 strands, all 7 thick sections long.
Take each strand and take a loop through the hairband - at all stages of this process try not to have the ends of the yarn exactly in line with one another, you get a better look and overall texture to the falls.
 Then take the two ends and push them through the loop, pulling the yarn so that it sits tightly against the band.

 Complete this process for all of your cut strands, then add one length of the roving.

Now start to add layers. Don't just keep looping yarn around the band. That way you get a lot of yarn on your band, but there's no bulk to it, the strands will all be spread along the entire band.
What I do is take another 6 strands of Colinette, this time 6 thicknesses long. And I loop them through some of the tighter loops created by the first base layer. Here's a pic of black yarn looped through the roving.
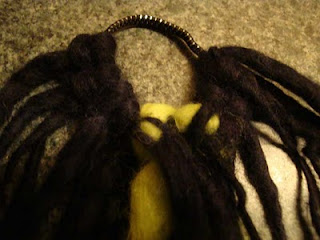
 Now another layer. This time I use 5 thickness lengths of Colinette, again using 6 or so, plus another two strands of roving.
The next layer is made up of 6 strands of Colinette, all 4 thicknesses long, plus more roving.


You need your basic ingredients and for my falls I always use a base of Point 5 wool by Colinette. Midnight (black, or as close as dammit) is the colour. I'm also using some lime green roving. The other yarn pictured here didn't get used in the end. It didn't look right. You'll also need a pair of scissors, two strong elasticated covered hairbands, a needle and thread and some hair beads and other things for decoration if decoration is what you want.

The lime green roving is shown here in the first stages of being formed into dreads. You pull a section of the roving away from the long thick strand you get, and then start rolling it between your hands. All the way along its length. To get a close texture to the fibres keep doing this over and over.


I start by taking strands of Point 5 and counting along the strand a regular number of thicker sections. The wool is both thick and thin and is consistent in this thick/thin texture along its length. So I start with 6 strands, all 7 thick sections long.
Take each strand and take a loop through the hairband - at all stages of this process try not to have the ends of the yarn exactly in line with one another, you get a better look and overall texture to the falls.


Now start to add layers. Don't just keep looping yarn around the band. That way you get a lot of yarn on your band, but there's no bulk to it, the strands will all be spread along the entire band.
What I do is take another 6 strands of Colinette, this time 6 thicknesses long. And I loop them through some of the tighter loops created by the first base layer. Here's a pic of black yarn looped through the roving.

Continue, loop strand after strand through previous loops, so that the strands sit on top of one another. Keep taking a look at your yarn fall. Does it need more stands? Add them. I add two more pieces of roving either side of the first one.

The next layer is made up of 6 strands of Colinette, all 4 thicknesses long, plus more roving.

Once I'm happy with the thickness of the falls I take my needle and thread and sew through all of the loops up at the hairband. Not lots and lots of stitching, just enough to make sure that everything is going to stay in place and be secure.

To complete your falls you can add beads, bells, wound sections of thread, shells, bits of jewellery...anything you can think of.
Bindi pics
Ok then, here are the picture of my recently made bindis. I'm not sure I'll have time today to get them measured and described for the Blackwillow Tribal website, nor will I get any up in the Etsy shop, so that's a job for tomorrow. Here's a sneak peek in the meantime:


 They've all had some extra bling added in the form of Swarovski crystals and are backed with clear vinyl. I'll let you know once they're up on the websites.


The bindi pictured above is SOLD


The bindi pictured above is SOLD

Monday, 7 February 2011
Development of a style....
Once upon a time I used to make symmetrical headdresses. Flowers on either side were well matched even if not exactly the same. Used to add a bit of jewellery, but not too much. Still made the bases in the same way that I do now in terms of basic construction, but I used to add less stuff.


For the most part I would make what I thought people could afford, and to be honest, that worked because everything I made got sold....
The next stage was to make things that weren't so symmetrical, flowers one side, feathers and other things on the other, with the addition of the beaded yarn tassels that I love to make as they add so much drama to a piece as well as lengthening the neck for everyone who wears them.

And now? Well now I just add whatever I can. Soon I shall throw caution to the wind and just go wild with something, but for the moment I still err on the side of affordability even if prices are higher than they used to be. Any I do try and make sure to add in a few pieces that have taken less work, less time to construct in order to offer a range of items with a range of prices.
But beauty is as beauty does and even with caution, things can get out of hand, too beautiful to bear, and although I'm still always happy to see an item go to a loved home, I'm sad to see it leave its place on display in my home.

Coming soon! How to make a fabulous headdress for yourself!
Subscribe to:
Posts (Atom)